
SampleManager LIMS Best Practices – Criteria Builder


Thermo Fisher Scientific’s SampleManager LIMS™ is a fully integrated laboratory platform encompassing laboratory information management (LIMS), scientific data management (SDMS) and lab execution (LES). The feature-rich design of SampleManager platform, which includes the SampleManager Criteria Builder, provides the tools necessary for organizations to create a connected, global knowledge base that can be shared across the organization to drive innovation. Laboratories in many different industries rely on SampleManager LIMS™ to help realize the full potential of their laboratory data.
SampleManager offers many features that help scientists sort and view data more efficiently. In this article, we will discuss the use of the SampleManager Criteria Builder feature that allows team members to quickly access relevant data for viewing or developing reports.
SampleManager Criteria Builder
In our recent blog on Personal Folders, we discussed how to build criteria in SampleManager Personal Folders to improve your ability to find and view data efficiently. This feature works well when a user wants to sort and filter data to show a specific personlized view. When an organization needs to create a quick report or a certain view of a table for more than one person, however, Criteria Builder can be used instead. This window has different names in SampleManager depending on where it is used, but it is exactly the same when building criteria in a folder, cabinet, or from scratch.
There are two ways to open the Criteria Builder:
- In the Navigator, go to the System Folders > Criteria Use the Right Mouse Button (RMB) menu to select “Add Criteria”
- Use the RMB menu on any folder or cabinet in the Navigator and select “Modify.” Then open the ‘Data Source’ tab
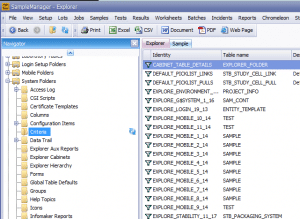
Figure 1: The criteria folder in the System Folders section
The window looks the same regardless of where you open it from. The only difference is, when you are creating or modifying criteria in the ‘Criteria’ folder, you get the same ‘General’ tab that is found in all .Net forms in SampleManager.
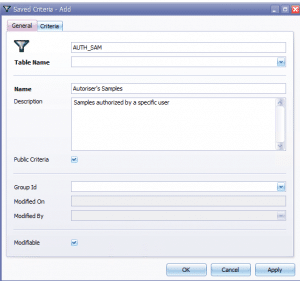
Figure 2: The General tab when creating new criteria.
When creating a new criteria, the ‘ID’, ‘Table Name’, and ‘Name’ fields must be entered. If the ‘Public Criteria’ box is checked, it will be available to all users. A ‘Group ID’ can be used if the criteria will apply to views used by only one group. However, this is not recommended because it can lead to the same criteria being built multiple times. For the rest of this article, we will show the ‘Data Source’ tab for modifying folders instead of the ‘Criteria’ tab.
Building Criteria
To build criteria:
- Click on the little green ‘Add’ (+) button.
- Select the criteria from the list of <Entity> Fields.
- Select the operator to use in the Operator column (=, >,<, >=, <=,or LIKE).
- Enter the value for the field.
- Use the AND, OR, and parenthesis ( ) operators to link fields together. These operators are found at the bottom of the drop down list when you click inside a ‘Criteria field’ box.
To see more than one field selection, use the AND operator. This would be utilized when you want to find all samples authorized by two Authorisers, for example.
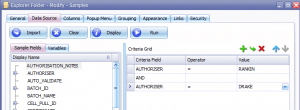
Figure 3: Example of using the AND operator.
On the other hand, if you want to find all samples that are Completed, you would use the OR operator, as both statuses “Completed” and “Inspection” mean that the samples have been completed in SampleManager.
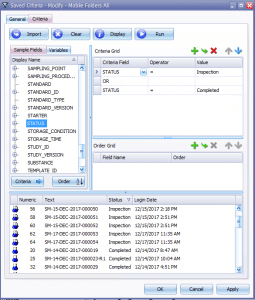
Figure 4: Example of using the OR operator
To group items together, use the parenthesis. If you wanted to see samples logged in during the past 30 days and were authorized by either authoriser, for example, you would build the criteria as seen below:
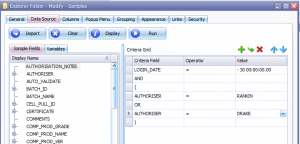
Figure 5: Example of how to use parenthesis
Import
If you want to create a new criteria based on a previously build critera, use the ‘Import’ button at the top of the window. The list shows all criteria from the Critera system folder filtered for the specified table or folder being modified. In this example, we are working with the Sample table, so the list shows only what is available for the Sample table.
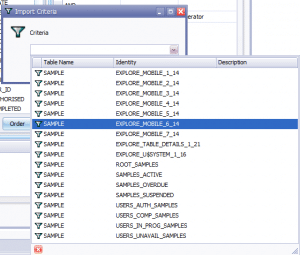
Figure 6: Example list of criteria that can be imported from the Criteria folder
Display
If you have a long list of criteria that can’t be seen in the window, use the ‘Display’ button. This shows a smaller list of all criteria. It can be a useful tool to spot errors or missing information.
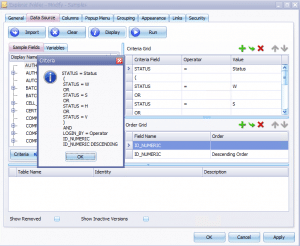
Figure 7: Example of the Display window.
Variables
Variables can also be used as values for any criteria field. To add a variable, click on the ‘Variables’ tab. Right click in the blank space and select “Add New.” Select the type of variable you want to use to open the window. The three types of variables are Environment, Prompt, and Parameter.
Environment variables are best used for getting the most up to date information – for example, if you wanted to see samples logged in on the current date. This cannot be done using the list of fields as criteria, because the date and time are fixed for all entries in the sample table. Instead, use the Environment variable ‘TODAY.’ This will select all entries between 12:00 am and 11:59 pm.
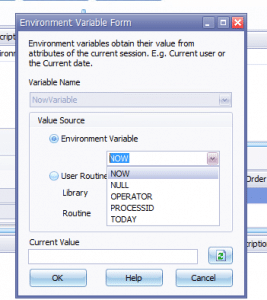
Figure 8: The Variable creation window
What if you wanted to see all samples in a certain status? You could create a folder with sub-folders for each status, or you can use a Prompt type variable. To create a prompt variable:
- Create a new variable called Status.
- Select the ‘$Status’ library entry and click OK.
- Add the variable as the value for the Status field.
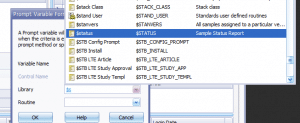
Figure 9: Selecting a library value.
The prompt window will appear before the folder opens to allow a user to select the status. The folder will then show the filtered results.
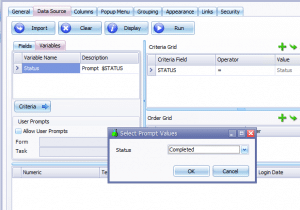
Figure 10: Example of a prompt box.
Another way to create a prompt is to check the ‘Allow User Prompts’ button. For this example we want to see samples from a selected sampling point.
- Create a Prompt type variable and add a name.
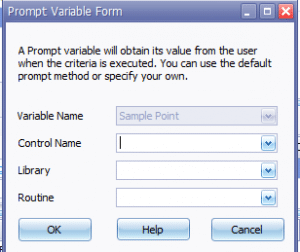
Figure11: Creating a Prompt variable.
- Click the OK button to close the window.
- Check the Allow User Prompts box.
- In the ‘Form’ field, select “‘Criteria User Prompt Template”
- In the ‘Task’ field, select “GenericUserPromptTask”
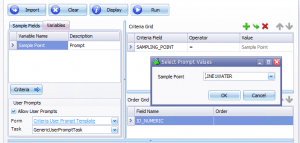
Figure 12: Example of the Allow User Prompts option.
The prompt list is generated based on the criteria field the prompt is assigned to.
SampleManager has a large list of forms and tasks that can be used with variables. Custom forms and tasks can be created using either VGL or C# .Net forms.
A Parameter type variable is most useful for setting up folders with specific information that cannotbe changed by the user. For example, parameter type variables are used to create cabinets to filter out data for a specific bulding, lab, or business group.
To create a parameter type variable, add a new variable and select the ‘Parameter’ type. The default value must contain the exact value input of the field you want to filter on. Unfortunately, there isn’t a drop down list to select from, so you need to know what the field value is before creating your prompt. In this example, we want to know which operators are assigned to the Chemistry lab.
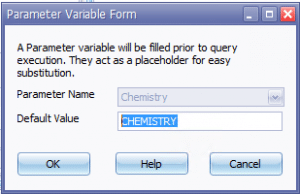
Figure 13: Creating a parameter type variable.
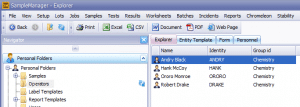
Figure 14: Folder with a parameter type variable assigned.
Conclusion
In this article, we explored the SampleManager Criteria Builder and we have seen how to create criteria to view information in the explorer. Criteria saved in the Criteria folder can be used to display information in the explorer, as well as many other places in SampleManager (when creating labels and reports, for example). Custom variables can be created and added to criteria using VGL and C# .Net forms.
The Astrix Team contains some of the most experienced and knowledgeable SampleManager experts in the world. Astrix provides an array of value-added professional services for SampleManager including implementation, training, upgrade and managed services. We can help you discover where and how to use criteria to make your SampleManager data more intuitive and easier to find. If you would like to explore some of the ways you could utilize Criteria Builder, or any of the other features that are available in SampleManager, do not hesitate to contact us for a no obligations consultation.
Astrix is a full service informatics consulting and staffing firm that has been serving the scientific community since 1995. We specialize in laboratory informatics strategic planning, vendor selection, development, implementation, integration, managed services and scientific staffing. Astrix professionals have the skills and expertise necessary to architect, implement, integrate and support best in class solutions for your organization’s laboratory environment.
Case Study: LabWare Centralized Data Review for a Global Biopharmaceutical Company
Overview A global biopharmaceutical company specializing in discovery, development,... LEARN MOREWhite Paper: Managing Data Integrity in FDA-Regulated labs.
New White Paper LEARN MORELET´S GET STARTED
Contact us today and let’s begin working on a solution for your most complex strategy, technology and staffing challenges.
CONTACT US