
Thermo Fisher Scientific’s SampleManager LIMS™ offers an extensive array of features and capabilities that can benefit your organization. SampleManager’s open architecture and client/server capabilities (Desktop Client, WebAccess™, Citrix Client) deliver the tools necessary to transform isolated laboratory data siloes into a connected, global knowledge base that can be viewed and shared across the wider organization, from R&D to manufacturing.
One little-used tool that helps users find and view data in SampleManager much more easily is Personal Folders. In this article, we will discuss how to create and leverage Personal Folders in SampleManager.
SampleManager Personal Folders
When a user opens up SampleManager, a default screen appears with a list of basic folders that hold various types of information. Users typically click on the public folders tab in the navigator to navigate through all the data and find what they are looking for, oftentimes having to click multiple times to get to the information they want to see. Time is then spent adding, moving, removing, and sorting data in the explorer to see the data in a way that makes sense.
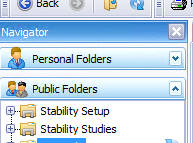
Fortunately, SampleManager has a built-in tool to help you find and view data easier – that little pane at the top of your navigator called Personal Folders. Many users never access this folder because they are either afraid of breaking something or just don’t know how to use them.
SampleManager personal folders require an existing Table or View in the structure file. The first step to creating a Personal Folder is to decide what information you want to see. Next, you need to decide if creating a Personal Folder for the information makes sense. If you can filter and sort data in a folder you already use, you can create a Personal Folder to show you your version of how the information is presented from the same view or table with just one click.
Take your requirements to your administrator and find out if all the information can be found on one table, if a new view can be created to combine the information from two or more tables, or if what you are looking for would be better seen in something other than a Personal Folder. What you are looking for may already exist and a change to a group or role setting may be all that is needed!
As an example, say you want to see how many samples are assigned to each of your analysts, and how many tests are needed to complete the sample. It may be possible to leverage the SAMP_TEST_RESULT view provided with SampleManager to get some of this information and build a folder based on it. However, we often find that, depending on your specific requirements, the view either needs to be modified or an entirely new view be created to fit your needs. View modifications are beyond the scope of this article, so for our purposes we will assume we have everything needed to build your personal folder as we dive into a discussion on how to create Personal Folders.
To add a note of caution, SampleManager does provide the ability to delete folders, but using this feature is not a good idea, as deleted folders don’t just go away. If you’re using SM 11.0 or earlier, other steps must be taken to remove the folder and clean up related objects from the system. So, if you create a folder that doesn’t work, chances are you are stuck with it. Cluttering your Personal Folders with folders that don’t work defeats the purpose of making it easier to find your display of the data!
Creating SampleManager Personal Folders – General Tab
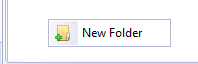
Just like with any static data, all you need to do is open the Personal Folders to see the Explorer, then right click and select ‘New Folder’ using the Right Mouse Button (RMB) menu.
This opens the Explorer Folder – Add window where all of the configuration settings are grouped by tab. The General tab allows more things to be done with the folder than can be contained in one article. For now we are only concerned with the Folder Name, Table Name, Description, and Group ID fields. Leave all other fields blank or at their default settings.
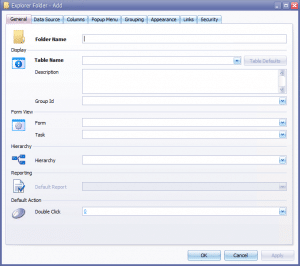
The Folder Name can be any name you want to give it. You can call it “Purple Wildflowers” if you wish but, keep in mind this name is what you will see in your Navigator and should be meaningful and intuitive. There is also a character limit, so a short, descriptive name is the best option.
The Table Name is the Table or View that will add data to your folder. SampleManager provides a drop down list by clicking the little arrow on the right. There is room to experiment if you select the wrong name, but once the Apply or OK button is pressed, the Table Name can’t be changed.
Leave the Group ID field blank. For Personal folders, you don’t need to restrict access to a group. Personal folders are kept with your profile information in SampleManager, so you are the only user who will be able to see them.
Data Source Tab
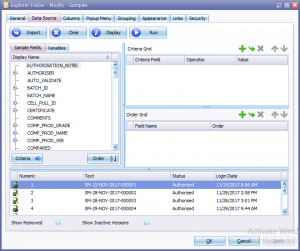
Click on the Data Source tab – this is where the main sorting and filtering takes place. The filtering of the data is mainly achieved by adding variables to create criteria, but if no criteria is set, then SampleManager will return all the data in the defined table. We discuss the basics of how to create criteria below, but for now do not apply any.
Before proceeding click the ‘Run’ button – this produces a preview of the data the explorer will return when you open your folder. Just like a normal folder, you can change the columns and sorting in this view. Make sure you can find all the data you are looking for in this preview. If you can’t, you most likely chose the wrong table for the Table Name. In this case, go back to the General tab to change the Table Name, then hit the ‘Run’ button again. Once you are confident you have the right table, click the ‘OK’ button. This will save and close your folder.
But wait! I’m not done. What about my changes?
Before going further, you want a starting point. Open your new Personal folder and change the columns, make groups, and sort data so it looks like you want it. Take a screenshot or write down your changes so you know what you need to change. This makes modifying the Data Source information much easier.
Now right click on your new folder and select ‘Modify’ to re-open it. Go back to the Data Source tab. On the left under the ‘<Entity> Fields’ tab is a list of the fields from the table selected as the Table Name. At the bottom of the list are two buttons – ‘Criteria’ and ‘Order.’ To use a field, click on the field name, then click either of these buttons.
The ‘Criteria’ button will move the field into the Criteria Grid and use it as a filter. Clicking the ‘Order’ button will add it as a way to sort the data. So if you want to see samples logged in by you and sorted by the date they were logged in, you would select the LOGIN_BY field and click ‘Criteria.’ Then, select the LOGIN_DATE and click ‘Order.’
The Criteria Grid can be used as an expression builder using basic mathematical expressions such as =, >, <, <> (not equal), and LIKE (search for something). The Logical expressions; And, Or, and parenthesis are available as Criteria when the ‘Add’ (+) button is used. Criteria can be as simple or as complex as needed to filter data down to exactly what you are looking for.
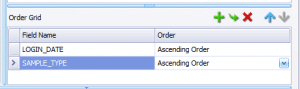
The Order Grid can be used as a way to sort multiple times. Sorting is applied from the first line down to the last. So for example, if the LOGIN_DATE is selected in the first line and the SAMPLE_TYPE in the second, the sorting will be applied by Login Date first then by Sample Type.
Columns Tab
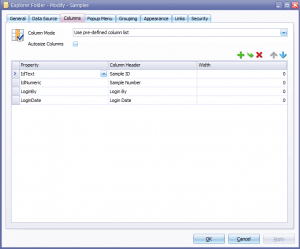
In the columns tab there are four options, but only two of them allow you to customize your columns. The ‘Use pre-defined column list’ option allows you to select the specific columns, order, and width by adding them to a list. Click the ‘Add’ (+) button to get started. If you took a screenshot or have a list of your columns, it makes adding your columns easy. If you don’t want to add columns manually, you can use the ‘User defined columns’ option instead. With this option, you can move columns as you did before, and the system will save the configuration when the folder is closed.
If you want your columns to be auto-sized to the contents, check the ‘Autosize Columns’ box, which proportionally sizes the columns to the window. We don’t recommend using this, because it tends to make the columns much wider than expected. Alternately, you can leave the column width at a value of zero (0), which will space the column width based on the default field size defined in the structure. This behaves like ‘Autosize Columns’ when changing the window size. Or, you can adjust the column width to a value of your liking.
Popup Menu Tab
This tab is used to set up an RMB menu for your folder. Setting these up requires knowledge and system privileges to create menus, which is out of the scope of this article. For most users, this can be left blank.
Grouping Tab
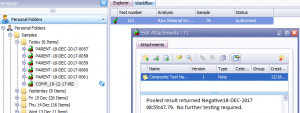
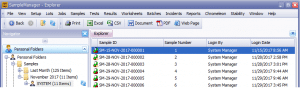
The grouping tab doesn’t do the same thing as adding a group in your explorer. Instead, it adds sub folders in the navigator to group the data in your personal folder. This can come in handy when the information in your folder becomes too large to view effectively. For example, the Samples folder shown in the figure below is grouped by date.
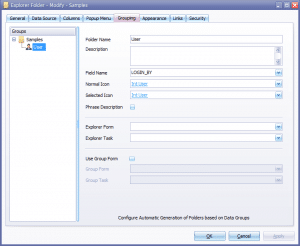
To add a group, right click in the blank space under the Groups heading and select ‘Add New.’ In the right pane, add a folder name and description if desired (this can be left blank). Select the field to group data by. The drop-down menu then provides all available fields in the table.
Add an icon for the sub folder, if desired. If this is left blank, the default folder icon will be used. If you check the ‘Phrase Description’ box, it will name the sub-folders by the description found in the field. Otherwise, it will use the field ID. Some fields are automatically sub-divided by the system. For example, if you want to group by date, folders will always be named by Day, Month, Year.
You can also group the data further to create sub-groups, for instance by the LOGIN_BY field, as seen below.
This would result in the following folder configuration when viewed in the explorer:
Options to use forms and tasks with the grouping requires knowledge of how to create and use forms and server tasks. These are not needed for most personal folders.
Appearance Tab
The Appearance tab is simply a place to select a custom icon for your personal folder or change the default icon. If icons were created for the sub folders in the Groups tab, these are not affected.
Links Tab
In the Links tab, users can select any child entities that are linked to a main entity in the folder. These link settings are typically inherited and defined in the Global Table Defaults folder for the entity type being displayed. For example, if your folder is based off of the ‘Jobs’ table, it is possible to drill down into any sample properties associated with that job because Sample properties are defined in the Jobs’ Global Table Defaults. Links configuration is beyond the scope of this article, but for our purposes, it is fine to leave the ‘Override Table Defaults’ checkbox unchecked.
Security Tab
Leave the Security tab at the default settings. Security for personal folders is not used because they are already specific to only the user who created them. Changing these settings can result in a folder you can’t see or use!
Conclusion
In summary, creating a basic Personal Folder in SampleManager to improve your ability to find and view data efficiently is not difficult. In this article, we have covered the basics about how to create your own Personal Folders, but you don’t have to stop here! As mentioned, there is a lot more you can do with folders in SampleManager.
The Astrix Team contains some of the most experienced and knowledgeable SampleManager experts in the world. If you would like to explore some of the other ways to organize your data with folders, or any of the other features that are available in SampleManager which could help improve the efficiency of your laboratory, do not hesitate to contact us for a no obligations consultation.